

How to Back Up Your Mac Photos to Amazon S3
 Your family photos are probably among the most important files on your computer. They cannot be recreated if your computer or files are lost, stolen, or damaged. In this post I’ll show how I do my personal photo backup every month.
You should already be backing up your photos (and all your other files) with Apple iCloud, Backblaze, Carbonite, or another service. If you don't already do that this article isn't for you. Go and get that done first. If you’re like me and already have a primary backup, but you’ll be most comfortable with another separate copy of your photos, then read on.
Note: as of October 2021, the MacOS Photos app on MacOS Catalina still doesn't allow exporting HEIF photos with all added metadata (keywords, etc) intact. If your backup must include keywords, adjusted dates/times/locations, and other data that you've added to various photos using the Photos app, don’t use the "unmodified original" option to export those photos for backup. You will be backing up JPEG files, not HEIF, but at least your metadata will be saved. If like me, you care more about backing up the original-quality HEIF photos more than any tags, you can use the "unmodified original" option. Hopefully the Photos app will soon (in MacOS Big Sur?) allow for backing photos up in original HEIF format with their metadata.
October 2021 revision: Added another smart album and export step to export edited live photos' with "Export Unmodified Original ...".
Contents:
- How Expensive Is This?
- Setup
- Export Non-Edited Photos
- Export Edited Photos to Preserve Edits
- Export Edited Live Photos' Original Data
- Compress
- Upload
- Final Thoughts
These instructions are what I follow on Mac OS Mojave at the time of writing, and I know they also work on the last couple years' Mac OS releases.
Here's what we're going to accomplish. Every month, we'll back up the prior month's photos:
- using a service like Amazon S3, or similar,
- saving full-quality images and videos where possible, and
- preserving edits and live photo effects so non-Apple devices and software can view them.
By "full-quality" I mean we will save the original full-size files in the Photos app, even the HEIC (photos) and HEVC (videos) files that newer iDevices capture. These file types offer a better combination of image quality and image size compared to the older file formats (like JPEG), so we want to save them if we have them. The Photos app degrades HEIC and HEVC files back to the older formats when you export them from the app, so we'll avoid that where possible.
Again, this is not meant to be your primary photo backup method. That should be done automatically and constantly (along with all the rest of your data) with a service like Apple iCloud, Carbonite, or Backblaze. This is intended to be a low-cost emergency backup of your most prized data possessions in case every other backup fails.
How Expensive Is This?
Amazon S3 pricing may vary a little depending on where you're located but my last month's S3 bill was $2.08 for 166.3 GB of photos and videos. In my AWS pricing region the exact price is $0.0125 (1 1/4 cents) per GB per month. That's $1.25/month for 100 GB, $6.25/month for 500 GB, and $12.80/month for 1 TB. If that cost is too high for you, and you already have a full backup of your all your photos elsewhere, you could consider just keeping your favorite photos in S3. For example, if you limit this backup 50 GB, it would cost just 63 cents per month and you could store about 25,000 of your most cherished photos.
As for pricing competition for Amazon S3, there are cheaper options like Microsoft Azure, Google Cloud Storage, Backblaze B2, and Wasabi. Beware that Wasabi has a 1 TB ($4.99) minimum monthly cost, so it's only inexpensive if you're storing more than 1 TB of data.
Note: I am deliberately ignoring each service's additional cost, where applicable, to download your data, because this backup is intended to stored and then only accessed in time of emergency. Beware that these data storage services can get more expensive if you download your backed-up photos with any frequency. Along these lines, another inexpensive option but with a more complex pricing model is Amazon Glacier — but only use this service if you are confident in your estimate of the costs involved to retrieve your backed up data.
Setup
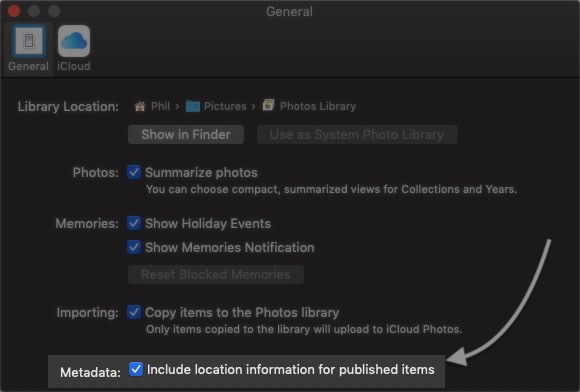
If one day you'll want to see where your photos were taken using their GPS data, you'll want to do this first. In the Photos app, Make sure the "Include location information for published items" box is checked in the "Photos" > "Preferences" menu on the "General" tab:
To find each month's photos and videos, and to separate the edited from the non-edited ones, we'll be making three smart albums in Photos.
First, create a new smart album for the edited photos of the month you’re going to back up. Along with edited regular photos, this will include "long exposure" shots and other live photo effects:
- match All conditions where
- photos are edited and
- filter by Date "is in the range" of the first of the month to the last day of the month
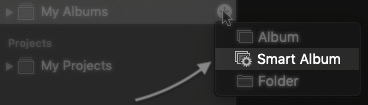

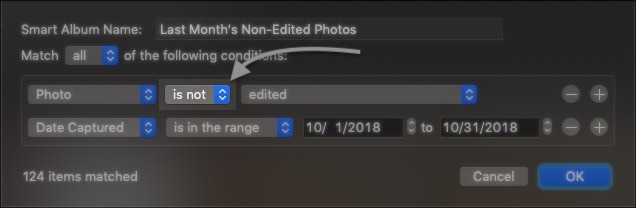
Create another new smart album for the non-edited photos of the month you’re going to back up:
- match All conditions where
- photos are not edited and
- filter by Date "is in the range" of the first of the month to the last day of the month
Finally, create the last smart ablum for the edited live photos:
- match All conditions where
- photos are edited and
- photos are "Live Photo"
- filter by Date "is in the range" of the first of the month to the last day of the month

Every month you'll just have to adjust the date ranges of these smart albums. This will make finding and selecting the photos and videos for backup very straightforward. Next we'll do the actual backup.
Export Non-Edited Photos
Make sure your "Last Month's Non-Edited Photos" album has the correct date range and shows the photos you expect.
Select all the photos in the album (⌘+A), then use the menu item "File" > "Export" > "Export Unmodified Original ..." and save them to a new folder. I like to use a consistent folder name pattern every month like "photos-2018-10".
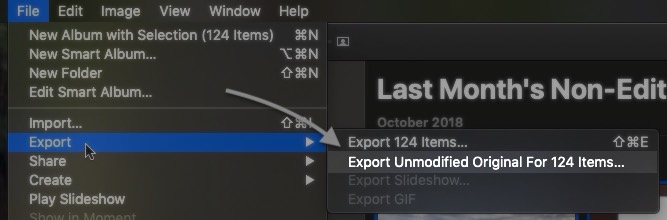
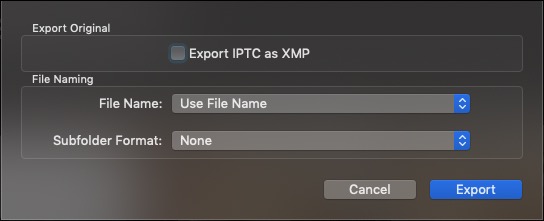
For the options screen for "Export Unmodified Original" I use the defaults:
Export Edited Photos to Preserve Edits
Now that you have the non-edited photos saved to an external folder, we can export the edited photos to preserve the edits. This means if you have to view these files in the future, your software won't have to be compatible with Apple's file format for edited photos — they can just be viewed as-is.
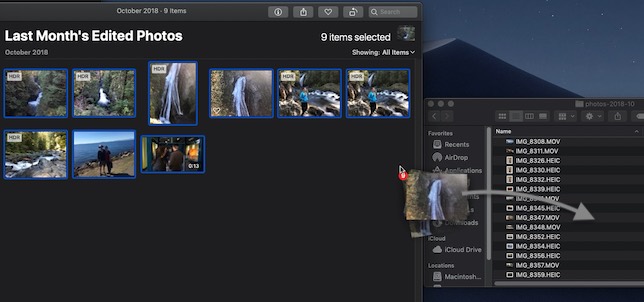
Make sure your "Last Month's Edited Photos" album has the correct date range and shows the photos you expect.
Select all the photos in the album (⌘+A) and drag them into the folder containing the exported non-edited photos. Those edited photos are now saved in their final edited state. If you also want the "unmodified original" of any edited photo, you can export those as well using same menu item from the above step.
Export Edited Live Photos' Original Data
"Edited" live photos, such as live photos that have been turned into a long exposure or a loop, should to be exported two ways:
- First, they need to be dragged to the Finder (we did this in the previous step "Export Edited Photos to Preserve Edits""). For edited live photos, "preserving edits" means, for example, the long exposures will be saved as an image file, and loops as gif files.
- Then, they also should be exported as "Export Unmodified Original ..." to save their under-the-hood video and still files. By backing up both, if you ever need to recover from backup you’ll have all the original data.
So since we've already backed them up for step 1 above, we just need to do step 2. Open the "Last Month's Edited Live" smart album, select all the photos in the album (⌘+A), then use the menu item "File" > "Export" > "Export Unmodified Original ..." and save them to the folder containing all the photos we've exported so far.
So to sum it up for live photos:
- Both edited and non-edited live photos have now been backed up with "Export Unmodified Original ..."
- Edited live photos have additionally been dragged to the Finder to preserve their edits
Compress
Now we're ready to upload the exported files to Amazon S3. Instead of uploading the individual files, we'll turn the entire exported folder into a single zip file. This doesn’t save much disk space, but it does make uploading easier.
Right-click the export folder in the Finder ("photos-2018-10" for example) then choose the "Compress ..." option. Now you can just upload the one .zip file.
Upload
The process for uploading will be slightly different depending on the service you're using, but for Amazon S3 backups I do the following:
- create a non-public bucket for your photos if you don't already have one
- since the bucket name has to be unique and I don't have to remember it, I use one like "photos-..." where the "..." part is just 20 or so random gibberish characters (or open the Terminal app, type
uuidgen, then hit the return key)
- since the bucket name has to be unique and I don't have to remember it, I use one like "photos-..." where the "..." part is just 20 or so random gibberish characters (or open the Terminal app, type
- create a folder for each year inside the "photos-..." bucket
- upload the zip files into the year folder using "Standard-IA" storage for lower cost
- since I will hardly be downloading the files, if ever, "Standard-IA" is cheaper for me
- use no encryption
- the photos aren't really sensitive, and in the case of a disaster where I need to access these backups I don't want to have to worry about finding the decryption key or password
Now that you've uploaded everything, you can delete all the exported folders and zip files you created. You're done for this month!
Final Thoughts
You may want to back up two month's worth of photos every month until you've backed up as far back in time as you wish. Or you may want to set aside a day and back everything up, though that can get tedious after a while.
And you might want to set up a calendar reminder every month to remind yourself to back up your photos :)
Disclosure: I am a Backblaze and Amazon S3 customer.
October 2021 revision: Added another smart album and export step to export edited live photos' with "Export Unmodified Original ...".