Testing Non-Astro Image Stacking with Drizzle
 For astrophotography, an essential technique is image "stacking" where the image data from many many single images is combined to create a much more bright, detailed, and less noisy final image. This is used with many long exposures of nebulae, galaxies, etc, or with many thousands of video frames of planets or the Moon.
It's also common to apply the "drizzle" algorithm to use all the extra data from those many stacked frames to actually increase the pixel count of the final image. By enlarging each source image by 3x in both horizontally and vertically, and applying some math while stacking those images, more pixel data can be extracted from the source.
I was curious how well this stacking with drizzle technique would work for a non-astro photo subject. It turns out it worked quite well!
Background
First of all, this is not a new idea. Called "sensor shift" or "pixel shift," some cameras perform a similar technique by taking several captures, with tiny movements of the sensor between shots, before computationally combining those to come up with a higher-resolution result.
My Canon EOS R6 however does not have this feature. As the below results show, it is possible to use the R6 and free software, AutoStakkert! 3, to end up with a similar result.
I'm not going to cover a step-by-step procedure here. There are many AutoStakkert 3 tutorials out there made by people who actually know what they're talking about. At a high level, AutoStakkert 3 has a "3x drizzle" option when stacking photos. This results in multiplying the source images' width by 3 and their height by 3, giving a 9x total increase in pixel count.
The Numbers
With AutoStakkert 3, I stacked the best 72% of 158 images — probably 114 images. On the R6, in electronic shutter mode, this is only a few seconds of shooting, which allows the natural light (sun angle, cloud cover, etc.) to be nearly identical from the first shot to the last.
I shot with an in-camera 1.6x crop, which on the Canon R6 results in images of 3408x2272 pixels. The 3x drizzle image came out to 9192x6552 pixels. The drizzle output has only about 7.8x the original image pixel count, not the expected 9x, because I set AutoStakkert 3 to output only the largest common rectangular region across all stacked images. The region that was actually drizzled is fully 3 times larger both horizontally and vertically.
To put this upscaling in perspective, the Canon R6 is, by 2022 full-frame camera standards, a low-megapixel camera with only 20.1 megapixels. The 1.6x crop images I shot are much smaller, at only 7.7 megapixels. The 3x drizzle image I created is well over 9,000 pixels wide and is 60.2 megapixels! If I were shooting in full-frame mode, this technique would output a 150+ megapixel image from the R6!
Another point of interest here is effective focal length. Based on this photography stackexchange question, I believe the 3x drizzle, because of the increase in pixel count, allows us to crop to effectively multiply the focal length by 3. Since I shot the images at 600mm with a 1.4x teleconverter, giving a 840mm focal length, this means I can crop to reveal what a focal length of 2,520mm would produce!
Before doing a close pixel-peeping inspection of the results, it's important to note that the drizzle image easily passes the eye test. This is (up to) a 9x true pixel increase. There is software available today that uses machine learning or other things to scale up an image (or to remove noise), but if you just take a series of shots and stack them with drizzle, you've already perhaps outperformed all that fancy machine learning guesswork by extracting real pixel data for two additional pixels between each neighboring pair of original pixels in any single original image. The quality and accuracy of the newly revealed pixels is probably dependent on many factors, and there's no magic involved here, but again, I stacked 7.7 megapixel images and got a 60.2 megapixel image, with more details revealed and noise removed — not machine learning guesswork.
Results Comparison
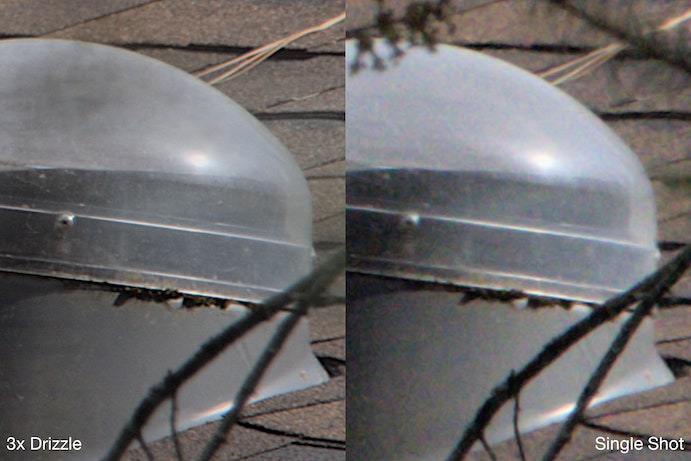
The subject of my test shot was a distant neighbor's roof... so I'm not going to show the entire image, only small 100% zoom crops (the "single shot" crops are at 300% zoom). I shot on a tripod at 840mm with an f/16 aperture. All the images were shot at ISO 3200 and were somewhat noisy.
For the below comparisons, both the drizzle image and the original had sharpening applied using GIMP. The original also first had a mild denoise filter applied with GIMP, since it was so noisy, but the drizzle images on the left did not have denoise applied — they didn't need any denoising!
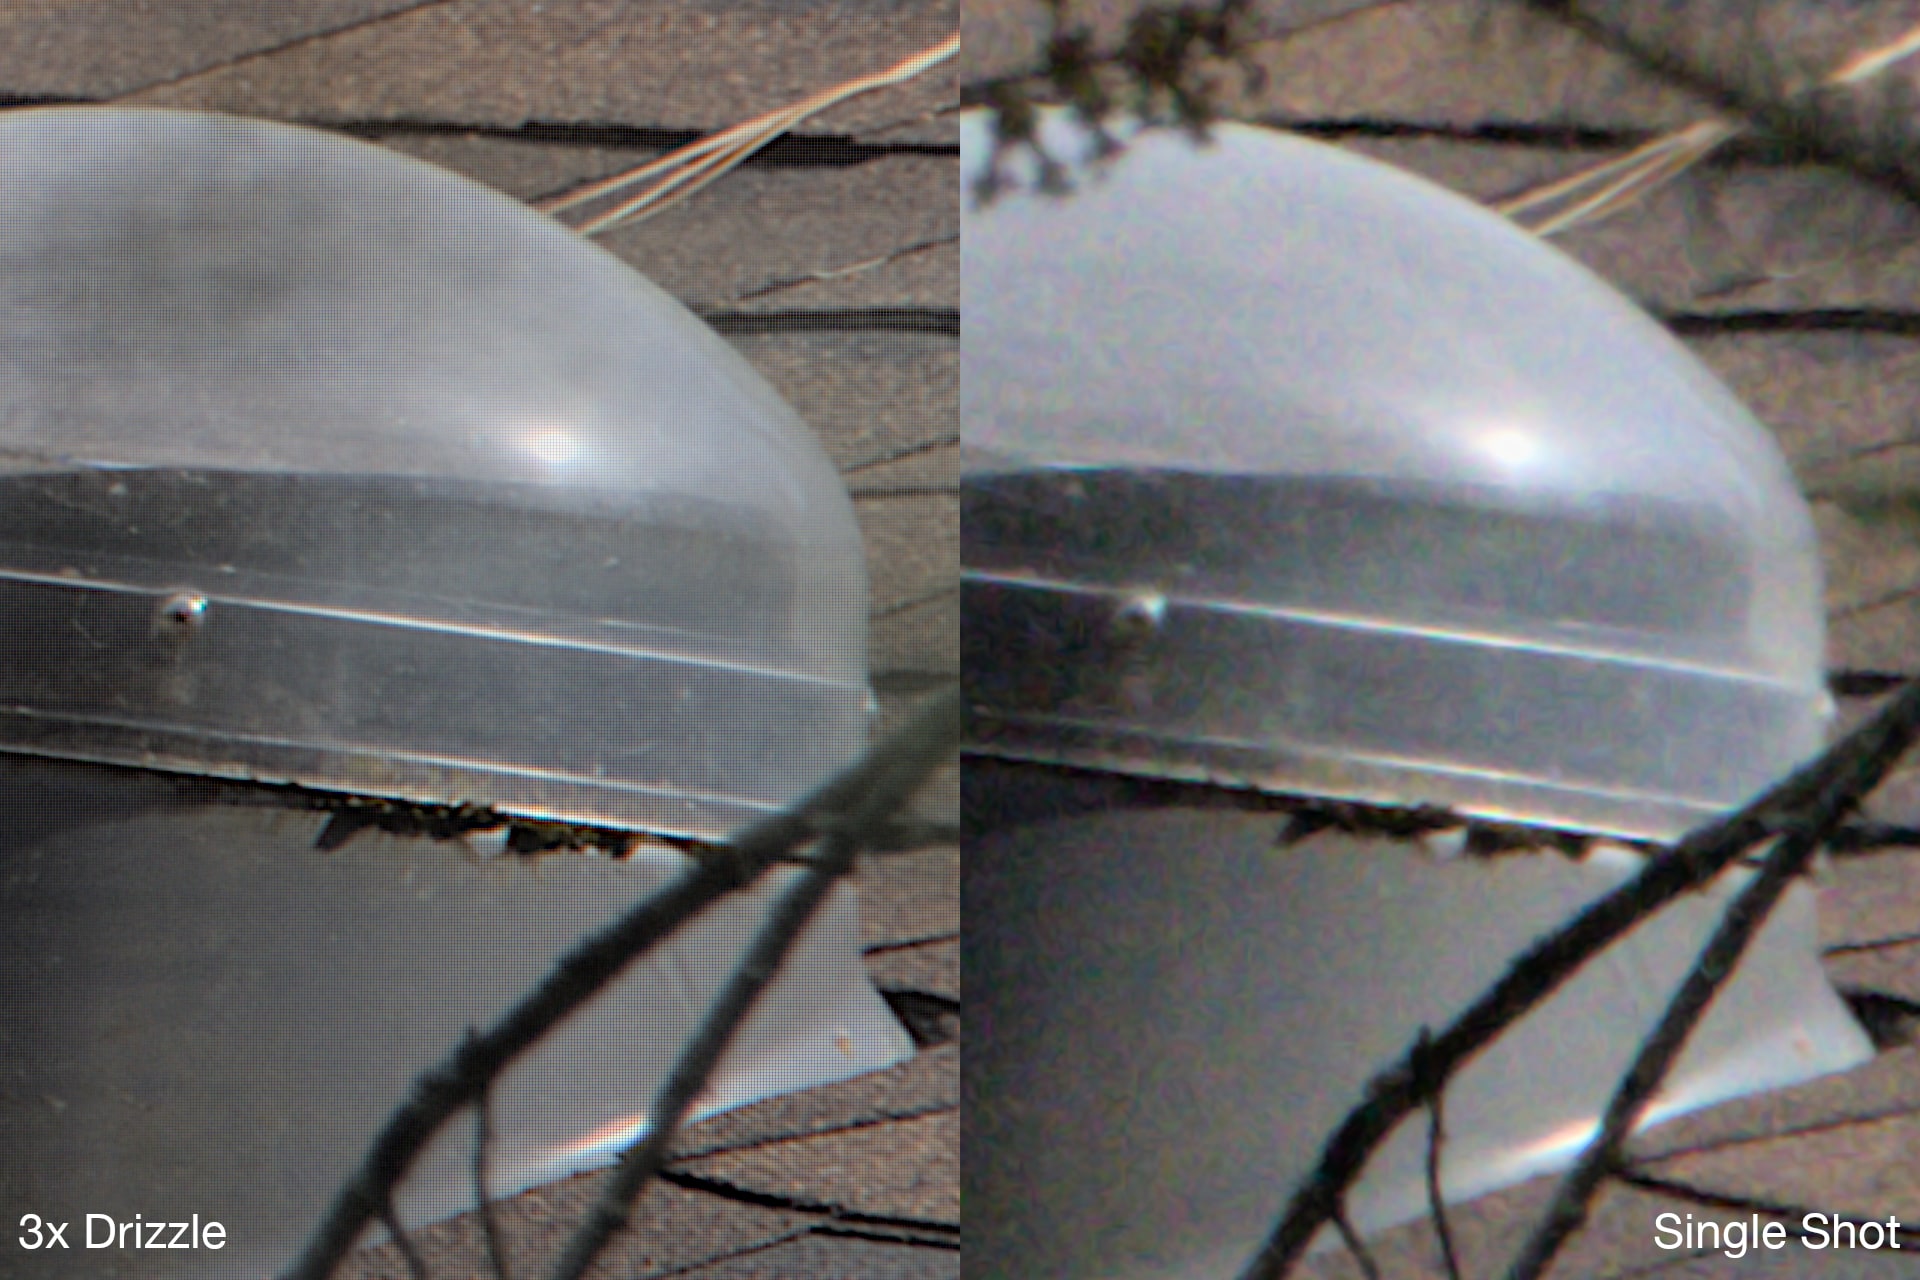
Here is sample 1 (click to enlarge):
This first image is near the focus point of the image. Here, the added detail and sharpness, as well as reduced noise, are clearly visible. It truly is like in a TV show where they "enhance!" a fuzzy image. This crop also shows a tree branch in the foreground on the single shot, but because the branch was moving slightly from one shot to the next, it became blurred and almost entirely invisible in the final drizzle image. This demonstrates how important it is to use this technique only on perfectly static subject matter. Flowing water, waves, tree limbs, etc., will be blurred and removed, similar to how a median stacking process can remove people from photos.
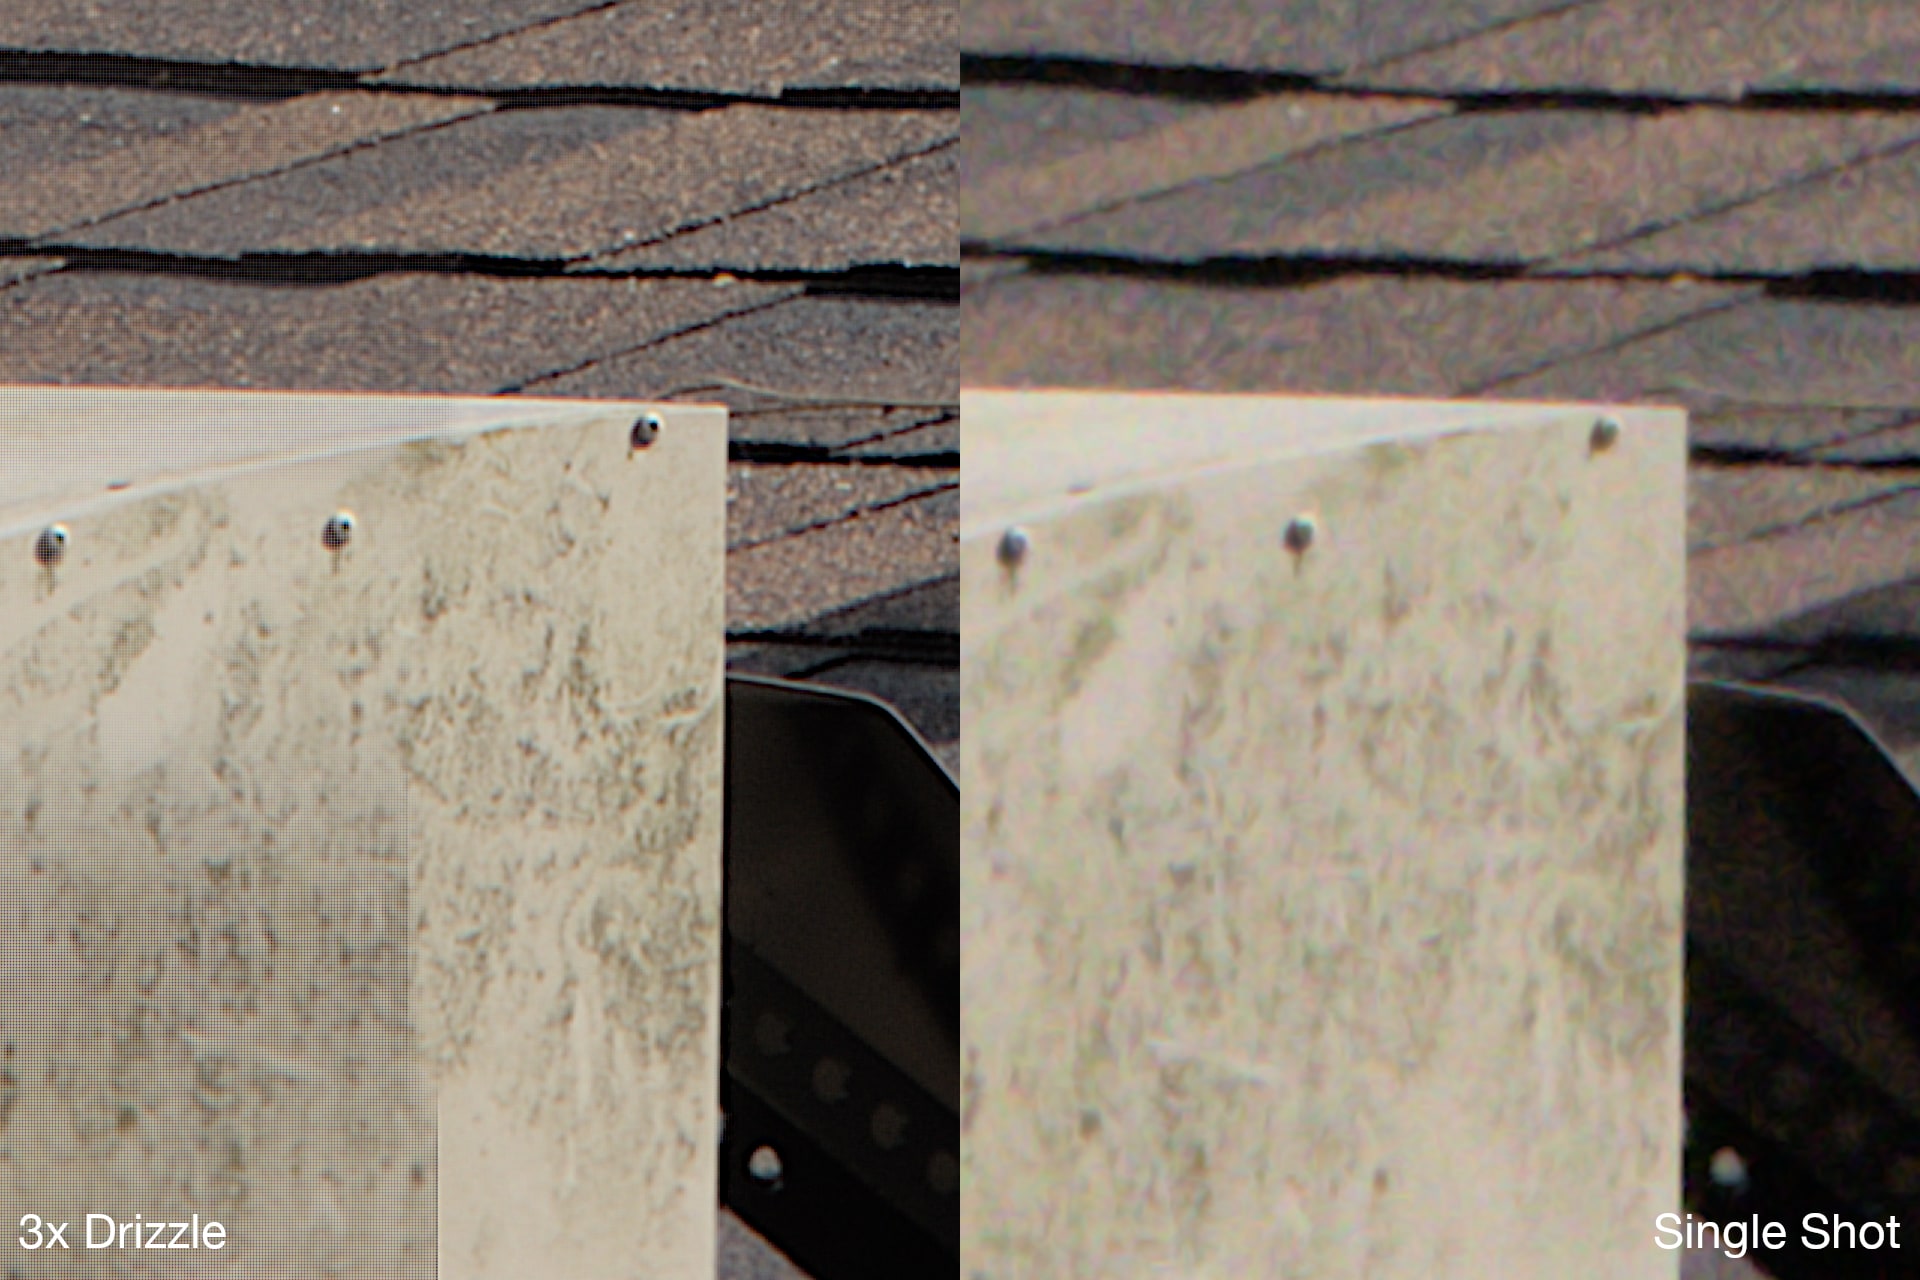
Sample 2:
Again, this is a region of the image that was in focus. And again, the increased sharpness and detail, and vastly reduced noise, are apparent. We also have an area with an image artifact that was somehow introduced during the stacking or drizzle process. I'm not experienced enough with AutoStakkert 3 to recognize what's going on, but I would imagine this could be fixed possibly with a separate stacking of a cropped portion of the source images.
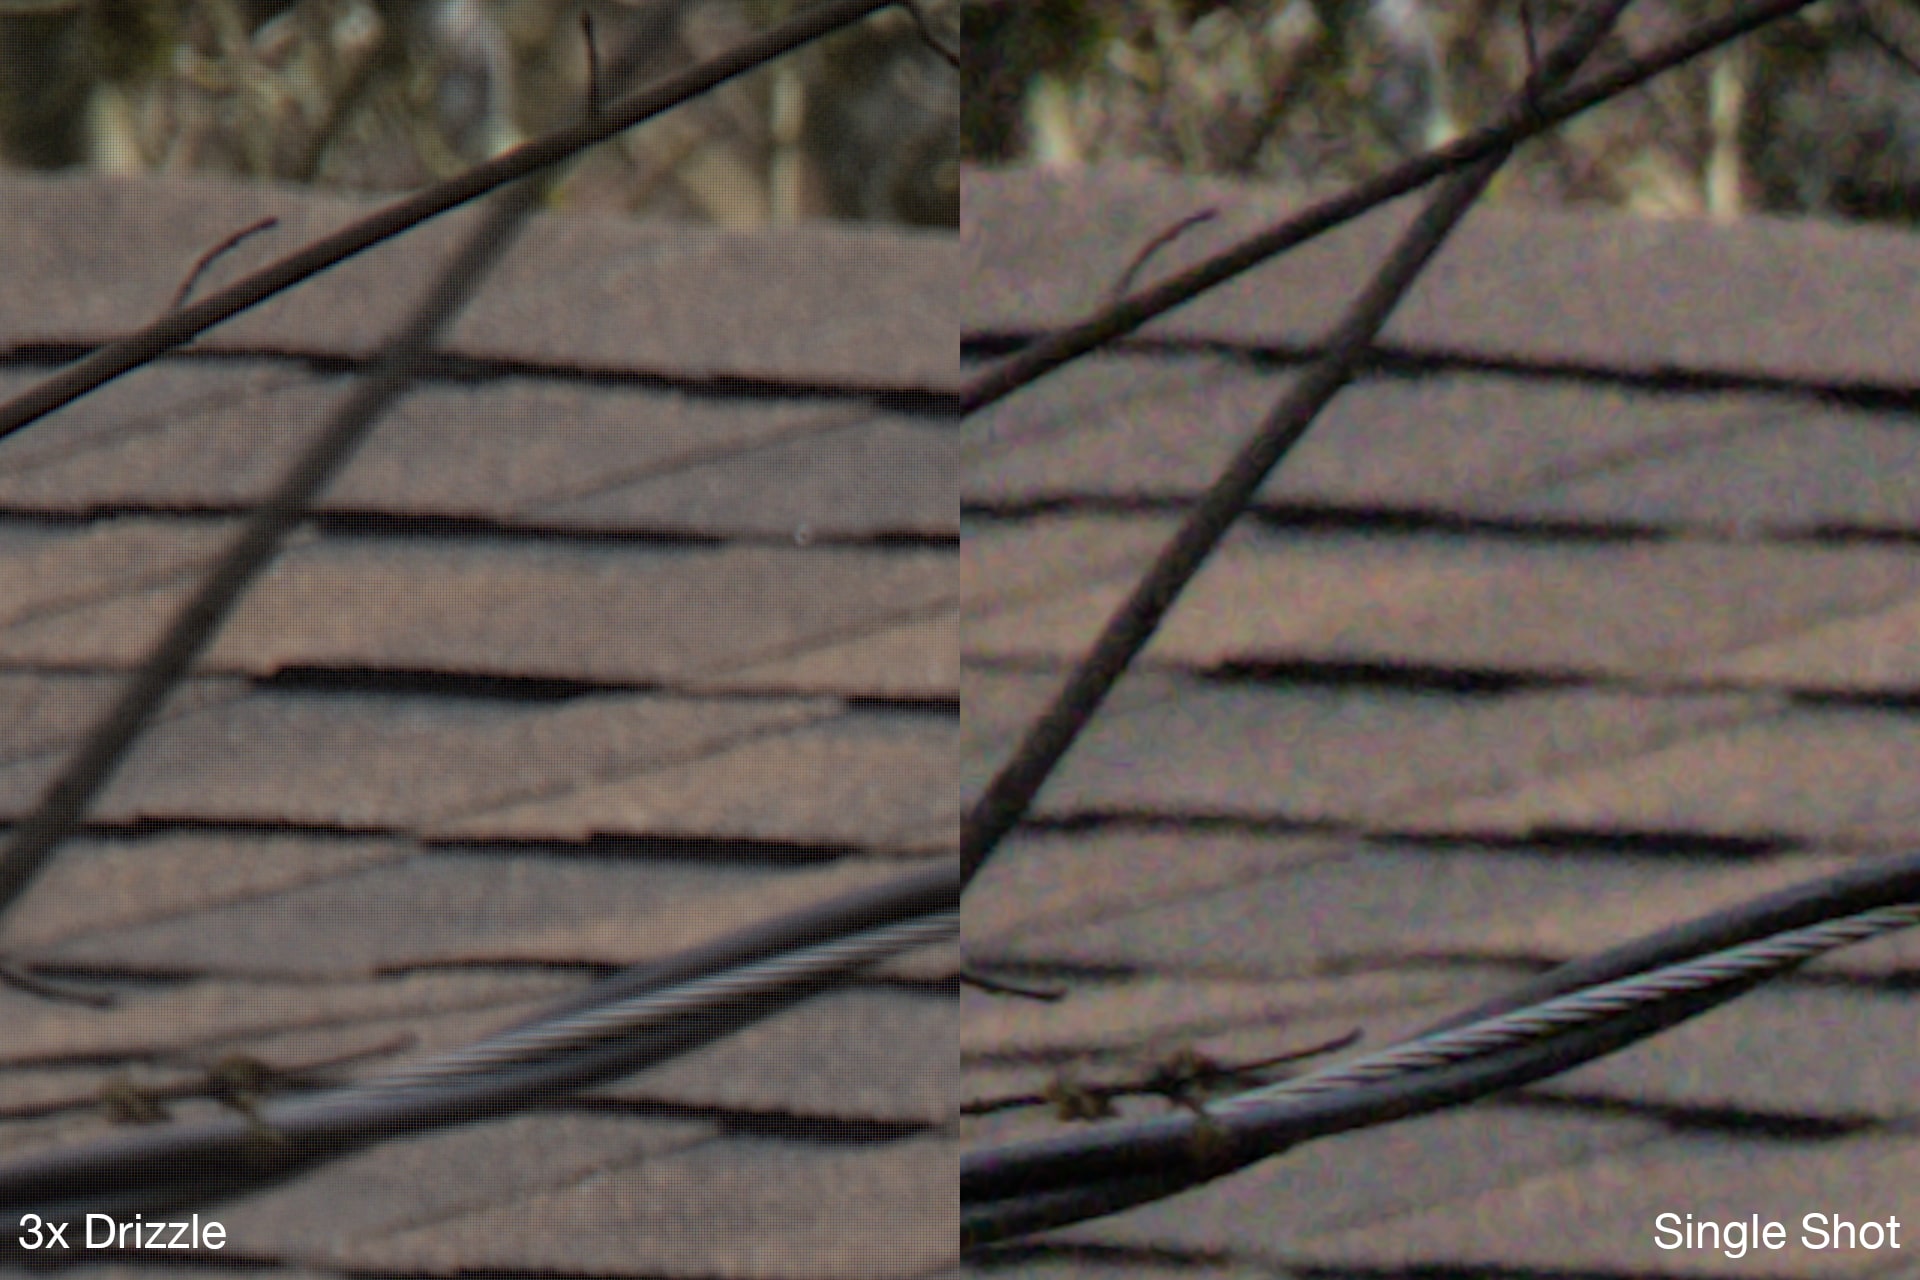
Sample 3:
In this last cropped sample, we are looking at an area of the image that was not in focus. The cable in the foreground looks to be sharper in the single exposure — possibly because the cable may have been moving in the breeze slightly, or maybe because I neglected to select the cable as an "alignment point" for the AutoStakkert 3 algorithm. Even though the roof shingles in this region are somewhat soft in the original image, they are still denoised and enhanced by the drizzle algorithm.
Conclusions
I thought this first test worked surprisingly well. Going from 7.7 megapixels to 60.2 is impressive to me. The noise reduction was especially impressive.
Questions:
- What is the best sharpening software to use on the drizzle'd image?
- How well does this work with handheld shots, assuming shutter speed is high enough to get sharp sots?
- How many shots, minimum, does this require?
- Can this be used for focus stacking to increase depth of field? Ir do existing tools/techniques work better?
Uses
This drizzle technique has many potential uses for me, including:
- landscapes (where upscaling is desired, and where moving trees or water are not visible),
- increasing sharpness and detail by upscaling and then shrinking the image back down to smaller dimensions,
- reducing noise in low-light situations (just stacking is needed, drizzle optional),
- distant subjects (birding),
- improving image quality attained with inexpensive cameras and lenses, and
- focus stacking (potentially).
The use case I originally had in mind for this was to help photograph a distant bird on a solid perch (not upon a tree branch blowing in the breeze). If I can take 20+ shots of it while it holds still (possibly with the camera mounted on a tripod), I believe I could end up with a much more detailed image of that bird than I could otherwise take.


